
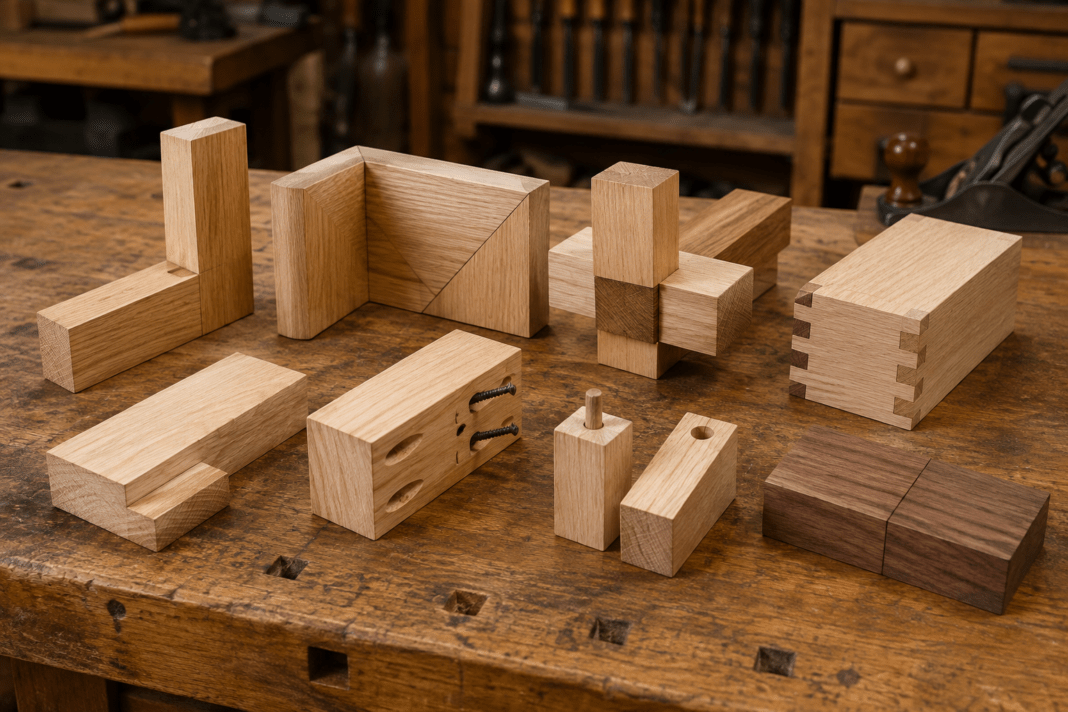
Learning a few basic woodworking joints can make the difference between a project that feels shaky and one that fits together cleanly and holds up well. The good news is that beginners do not need complicated machinery or advanced joinery skills to start building useful, attractive projects.
In this guide, we will look at 7 woodworking joints for beginners, including what each joint does, where it works best, the basic tools you may need, and the mistakes that commonly cause trouble. You will also learn how to choose a joint based on the project instead of simply using the same connection every time.
If you are still getting comfortable with layout and cutting, review our beginner’s guide to measuring and cutting wood accurately before practicing these joints. Good joinery starts with pieces that are square, accurately marked, and cut to the intended size.
7 Woodworking Joints Every Beginner Should Understand
| Joint | Best Beginner Uses | Typical Tools | Difficulty |
|---|---|---|---|
| Butt Joint | Simple boxes, frames, basic assemblies | Saw, drill/driver, clamps | Easy |
| Miter Joint | Picture frames, trim, decorative corners | Miter saw or miter box, clamps | Easy–Moderate |
| Lap Joint | Frames, supports, shop projects | Saw, chisel, square | Moderate |
| Dado Joint | Shelves, cabinets, dividers | Router or table saw, measuring tools | Moderate |
| Rabbet Joint | Boxes, cabinet backs, panels | Router or table saw | Moderate |
| Pocket-Hole Joint | Furniture frames, face frames, quick assemblies | Pocket-hole jig, drill/driver | Easy |
| Dowel Joint | Frames, panels, furniture parts | Drill, doweling jig, clamps | Moderate |
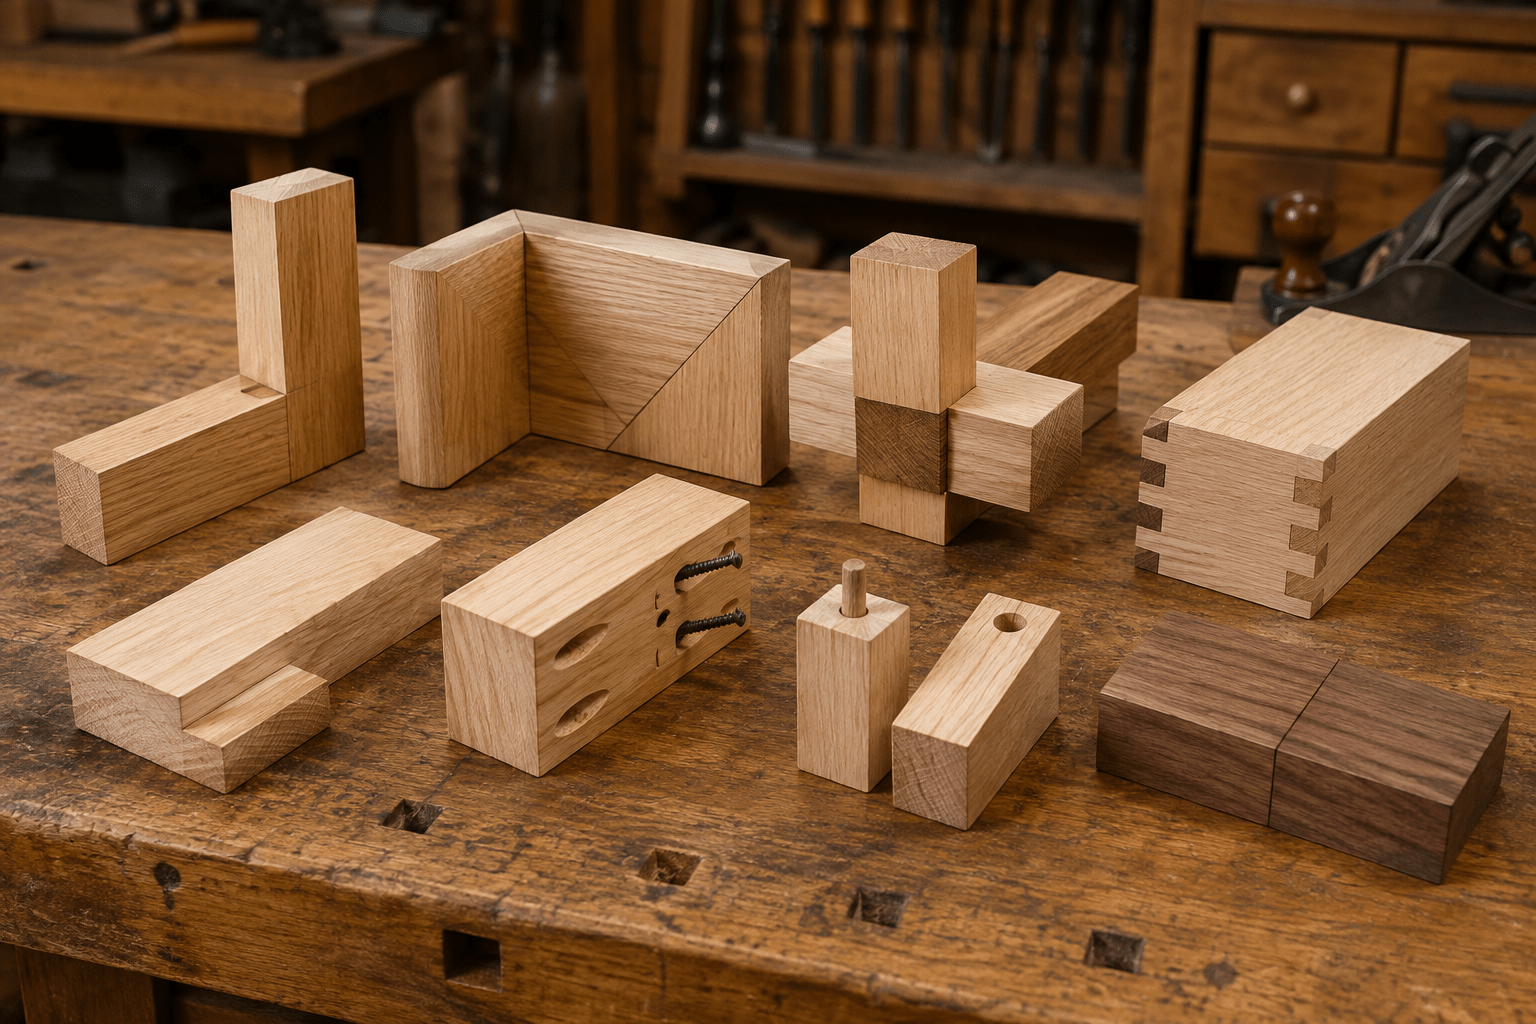
1. Butt Joint: The Simplest Place to Start
A butt joint is exactly what its name suggests: one piece of wood simply butts against another. There are no interlocking cuts, grooves, or hidden parts. Because it is so straightforward, this is often the first joint a beginner uses.
Butt joints work well for quick shop projects, simple frames, utility boxes, and assemblies where screws, nails, brackets, dowels, or pocket screws can reinforce the connection. A butt joint held together only by glue can be weak when the joint depends heavily on end-grain bonding, so reinforcement is often useful.
Basic tools
- Saw for square cuts
- Combination square or speed square
- Drill/driver if screws are being used
- Clamps
- Wood glue when appropriate
Common beginner mistake: Joining two pieces that are not cut square. Even a small error can create a visible gap or pull the entire assembly out of alignment. Dry-fit the pieces first and check the corner with a square before fastening them permanently.
2. Miter Joint: Clean Corners With a Finished Look
A miter joint joins two pieces cut at matching angles. The familiar example is a picture frame, where two 45-degree cuts meet to create a 90-degree corner. Because the end grain can be hidden, a well-made miter joint gives projects a clean, finished appearance.
Miter joints are useful for picture frames, trim, decorative boxes, edging, and projects where appearance matters. The challenge is accuracy: if either angle is slightly off or the two pieces are different lengths, the corner may open up.
A powered miter saw makes repeatable angled cuts easier, but beginners can also make basic miters with a hand saw and miter box. Clamp the pieces carefully during glue-up so they do not slide out of alignment.
Common beginner mistake: Assuming the saw’s angle setting guarantees a perfect joint. Always test with scrap wood first, especially when making four-sided frames where small errors can accumulate.
3. Lap Joint: More Glue Surface and Better Alignment
A lap joint is made by overlapping two pieces of wood. One of the most useful versions for beginners is the half-lap joint, where material is removed from both pieces so they overlap while remaining close to the original thickness of the stock.
Half-laps are useful for frames, cross supports, workbench parts, shop fixtures, and other projects where you want more contact between the pieces than a simple butt joint provides. The overlapping surfaces help with alignment and create a generous area for glue.
You can make a basic half-lap with a saw and chisel. Mark the waste carefully, make controlled cuts, remove the waste gradually, and test the fit often. The goal is a joint that seats fully without requiring excessive force.
Common beginner mistake: Removing too much material too quickly. It is easier to trim a joint that is slightly tight than to repair one that has been cut too loose.
4. Dado Joint: A Practical Choice for Shelves
A dado is a flat-bottomed groove cut across the face of a board so another piece can fit into it. If you have ever seen a shelf fitted into a groove in the side of a bookcase, you have seen the basic idea.
Dado joints are especially useful for shelving, cabinets, dividers, storage units, and other projects where one board needs to be supported by another. The groove helps position the mating piece and gives the assembly more mechanical support than simply fastening a shelf against a flat surface.
A router can make dadoes accurately with the right setup, and a table saw can also be used with appropriate techniques and safety precautions. Whatever method you choose, make test cuts in scrap wood before cutting the actual project parts.
Common beginner mistake: Cutting the groove before confirming the actual thickness of the piece that must fit inside it. Nominal lumber and sheet-goods dimensions do not always match the number printed on the label. Measure the real material first.
5. Rabbet Joint: Simple and Useful for Boxes and Panels
A rabbet is a recess cut along the edge or end of a board. Unlike a dado, which is surrounded by material on both sides of the groove, a rabbet is open along one edge.
Rabbets are commonly used for box corners, cabinet backs, drawer parts, panels, and other assemblies where one piece needs a shoulder or ledge to register against. That ledge makes positioning easier and can help keep parts aligned during assembly.
Routers and table saws are common tools for cutting rabbets. Beginners should focus on keeping the cut consistent and making multiple controlled passes when necessary instead of trying to remove too much material at once.
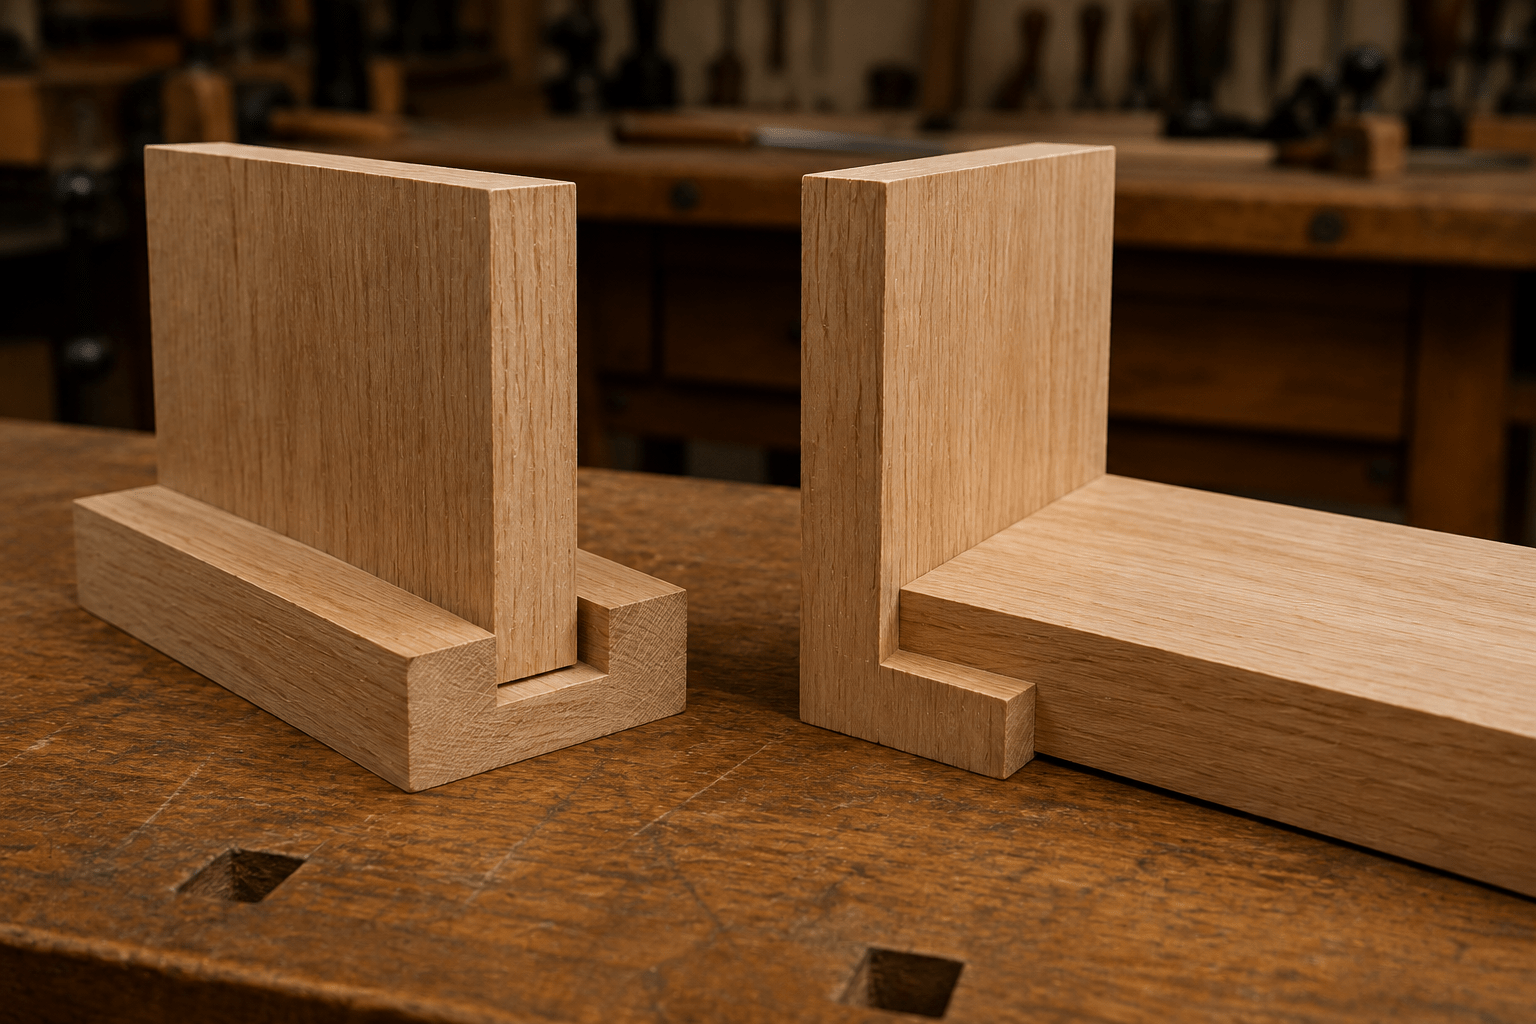
Common beginner mistake: Confusing a dado and a rabbet. Remember: a dado sits within the face of the board, while a rabbet runs along an edge.
6. Pocket-Hole Joint: Fast, Beginner-Friendly Assembly
Pocket-hole joinery uses an angled hole drilled into one workpiece so a screw can pull it tightly against another. A pocket-hole jig guides the drill bit at the proper angle and makes the process much easier to repeat.
This is one of the most approachable woodworking joints for beginners because it requires relatively little layout and can produce strong, practical assemblies quickly. Pocket holes are commonly used in face frames, tables, benches, cabinets, furniture frames, and many weekend projects.
If drilling accurately is still challenging, our guide on how to drill straight holes in wood covers drill setup, alignment, tear-out prevention, and other fundamentals that also improve general joinery work.
Use the screw size recommended for the thickness and type of material being joined. Clamp the pieces before driving the screw so they cannot shift as the joint tightens.
Common beginner mistake: Overtightening the screw. Driving it too aggressively can strip the hole, damage the wood, or pull the pieces out of alignment.
7. Dowel Joint: Clean Joinery Without Visible Screws
A dowel joint uses short wooden dowels inserted into matching holes in both workpieces. When the holes are accurately positioned, the dowels help align the pieces while creating a connection with no visible screw heads on the outside of the project.
Dowels work well for frames, small furniture, edge-to-edge alignment, rails, panels, and projects where you want a cleaner appearance than exposed fasteners provide. A doweling jig is especially helpful because the two sets of holes must line up closely.
Use a depth stop or carefully marked drill bit so the holes are deep enough for the dowels without drilling through the workpiece. Dry-fit everything before adding glue.
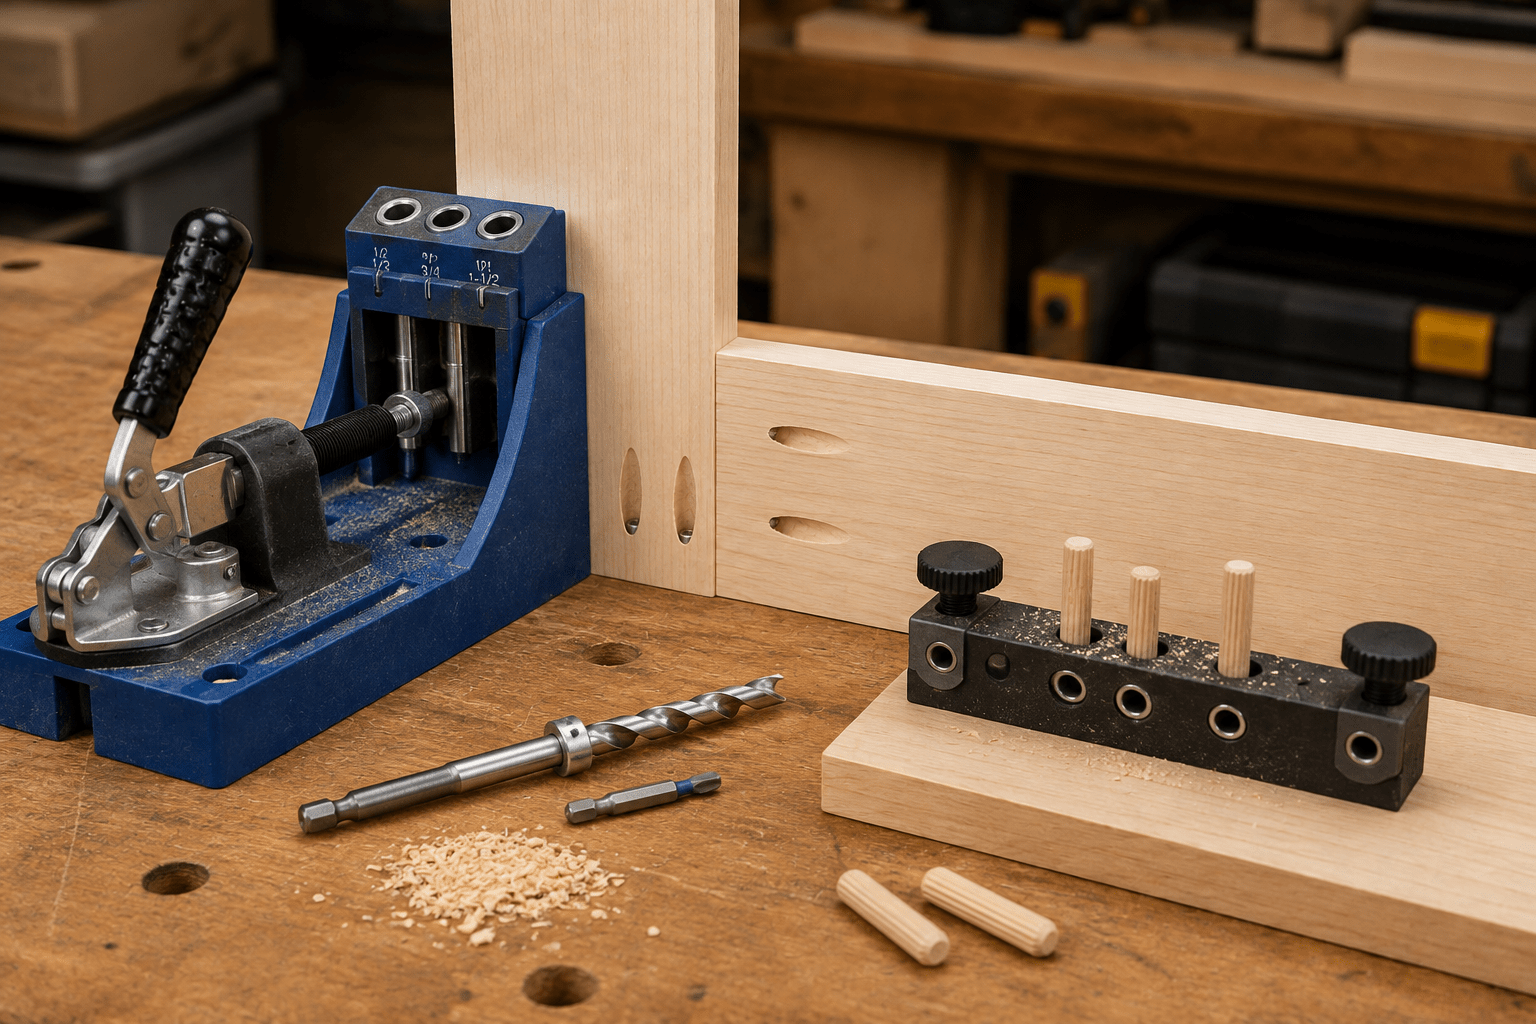
Common beginner mistake: Drilling the mating holes slightly out of alignment. A small positioning error can prevent the joint from closing completely, which is why a jig and careful marking are so useful.
How to Choose the Right Woodworking Joint
There is no single “best” joint for every project. The right choice depends on what you are building, how much load the joint must handle, whether the connection will be visible, what tools you own, and how much precision the project requires.
- Need the simplest possible connection? Start with a reinforced butt joint.
- Want a decorative corner? Consider a miter.
- Building a frame or support structure? A lap joint can provide useful overlap.
- Installing shelves or dividers? A dado is often a practical option.
- Building boxes or fitting backs into cabinets? Rabbets can simplify alignment.
- Want fast assembly with basic tools? Pocket holes are beginner-friendly.
- Want hidden joinery without visible screws? Dowels are worth learning.
Your material matters too. Softwoods, hardwoods, plywood, and other sheet goods behave differently when they are cut, drilled, screwed, and glued. If you are unsure what material fits your project, read how to choose the right wood for beginner woodworking projects.
5 Habits That Make Beginner Joinery More Accurate
1. Measure the actual material
Do not assume every board or panel matches its advertised dimensions perfectly. Measure the pieces you are actually using, especially before cutting dadoes, rabbets, dowel holes, or other joints where the fit matters.
2. Mark the waste side of every cut
A simple pencil mark can prevent you from removing material from the wrong side of the layout line. This becomes increasingly important as joints require multiple cuts.
3. Test on scrap wood first
Before cutting an important project part, reproduce the joint on an offcut from the same material. A test piece lets you adjust blade position, router depth, jig settings, or drilling alignment without ruining the finished component.
4. Dry-fit before adding glue
Assemble the joint without glue first. Confirm that the pieces seat fully, the project remains square, clamps can reach where you need them, and you understand the assembly order. Glue-up is much less stressful when you have already rehearsed the process.
5. Work safely and deliberately
Joinery often involves repetitive cutting, drilling, routing, and clamping. Do not rush simply because a joint looks small. Use appropriate eye and hearing protection, keep hands clear of cutting paths, secure workpieces properly, and follow the operating instructions for your tools. Our beginner woodworking safety guide covers the workshop habits worth establishing from the start.
Which Joint Should You Practice First?
If you are completely new to joinery, begin with a square butt joint and learn to keep an assembly aligned while drilling, fastening, and clamping. Then try a pocket-hole joint because the jig removes much of the guesswork. From there, a half-lap introduces controlled material removal, while dowels teach more precise drilling and alignment.
Once those basics feel comfortable, practice dadoes and rabbets on scrap wood before using them in shelving or cabinet projects. Miters are also worth practicing because they quickly reveal whether your measuring, cutting, and setup habits are accurate.
You do not need every woodworking tool at once to learn these skills. If you are still assembling your workshop, see our guide to essential woodworking tools for beginners and build your tool collection around the projects you actually intend to make.
Put Your Joinery Skills Into a Real Project
The fastest way to understand woodworking joints is to use them in something practical. A small shelf, simple bench, box, frame, or shop organizer gives you a reason to measure accurately, make repeatable cuts, dry-fit parts, and correct mistakes while the project is still manageable.
If you are deciding what to build next, take a look at 7 small woodworking projects for a weekend. Beginners who want a more structured start can also review our guide to planning your first woodworking project.
Ready for Your Next Woodworking Project?
If you want project ideas and plans that give you a practical reason to use the skills you are learning, explore our woodworking plans and find a project that fits your experience level and workshop.
Final Thoughts on Woodworking Joints for Beginners
Good joinery is not about learning the most complicated technique first. It is about making accurate cuts, understanding how two pieces of wood interact, and choosing a connection that makes sense for the job.
Start with simple butt and pocket-hole joints, then add miters, laps, dadoes, rabbets, and dowels as your accuracy improves. Practice each technique on scrap wood, dry-fit before assembly, and pay attention to what makes a joint close cleanly and stay square.
With those habits in place, each new project becomes an opportunity to build not only something useful, but also the joinery skills that make future woodworking projects easier and more rewarding.

